Quick Start
Track your first object in under 5 minutes. Choose your path:
- With Physical Object — Track a real object using your phone (AR) or webcam. Follows the video tutorial above.
- Without Physical Object — Evaluate tracking on desktop using a pre-recorded sequence. No camera or device needed.
Why a Quest controller?
We use the Quest 2 controller because most AR/VR developers have one handy. However, its rounded shape and symmetry make it a moderately challenging target — objects with distinct features, flat faces, or asymmetric shapes will track more reliably.
Want to test with your own 3D model but don't have the physical object? Use the Recording & Playback guide to record a synthetic sequence from the Unity Scene View.
1. Download the Controller Model
Download the official Meta Quest controller 3D models:
Extract the downloaded ZIP file.
2. Import the Controller Model
- In the Project window, right-click in
Assetsand create a folder calledQuickstart, with a subfolder calledModels - From the extracted ZIP, find
quest2_controllers_div0.fbxand drag it intoAssets/Quickstart/Models - Select the imported FBX and configure the Import Settings:
- Model tab: enable Read/Write, click Apply

- Rig tab: set Animation Type to
None, click Apply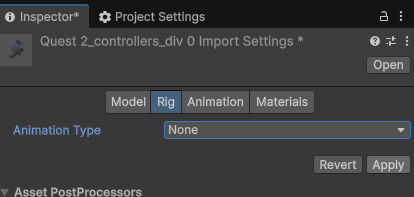
- Model tab: enable Read/Write, click Apply
3. Set Up the Scene
- Delete the default Main Camera from the scene
- Go to GameObject > XRTracker > AR Tracker (for mobile) or PC Tracker (for webcam)
- This creates the camera rig and an
XRTrackerManager
- Go to GameObject > XRTracker > PC Tracker
- This creates a PC camera and an
XRTrackerManager -
Download and import the sample sequence:
Import via Assets > Import Package > Custom Package. The package extracts a recording to
Assets/StreamingAssets/Recordings/Quest2Controller/. -
Select the
PC_TrackerGameObject and set:- Image Source to
Sequence - Sequence Directory to
Recordings/Quest2Controller
- Image Source to
4. Register Your License
- Go to Tools > XR Tracker > License Registration
- Register for a free Developer license — no payment required
- The license file auto-downloads into your project and is assigned to the manager
5. Prepare the Mesh
- Drag
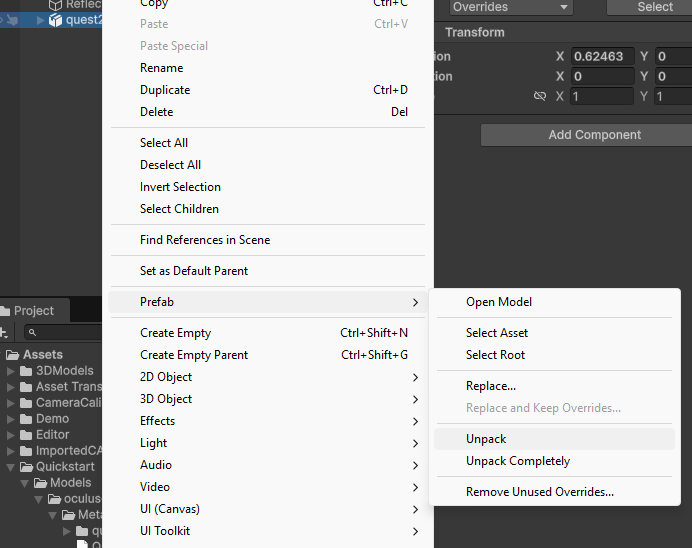
quest2_controllers_div0from the Project window into the Scene Hierarchy - Right-click the instance and select Prefab > Unpack
- Expand the hierarchy and find
right_quest2_mesh - Drag
right_quest2_meshto the root of the Hierarchy - Delete the remaining
quest2_controllers_div0parent — we only need the right controller mesh
6. Add the TrackedBody Component
- Select
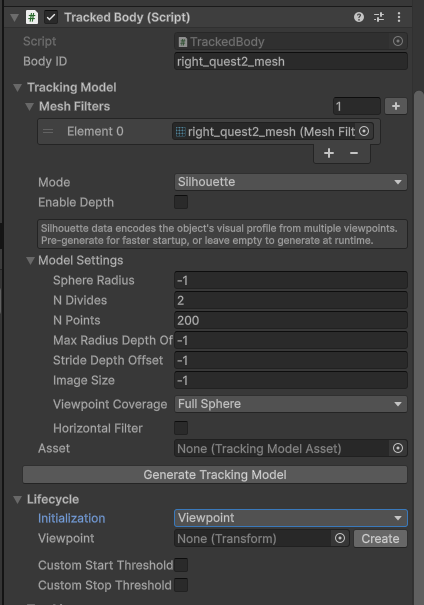
right_quest2_meshin the Hierarchy - Click Add Component and add TrackedBody
- The Mesh Filters field auto-populates from the GameObject and its children — these are the meshes XRTracker will use to represent and track this object
No model generation needed
The default tracking mode is edge tracking, which works directly from the mesh geometry — no model generation step required. If you'd like to use silhouette tracking instead, see the Silhouette Tracking guide.
7. Set Up a Viewpoint
The viewpoint defines the pose from which the tracker first searches for the object. A good viewpoint shows the object from roughly the same angle the real camera will see it.
- In the TrackedBody inspector, find the Lifecycle section
- Set Initialization to
Viewpoint - Click the Create button next to the Viewpoint field
- Navigate the Scene View so the object looks roughly like it will through your camera
- Select the
ViewpointGameObject - Use GameObject > Align With View (Ctrl+Shift+F) to snap it to the current Scene View camera
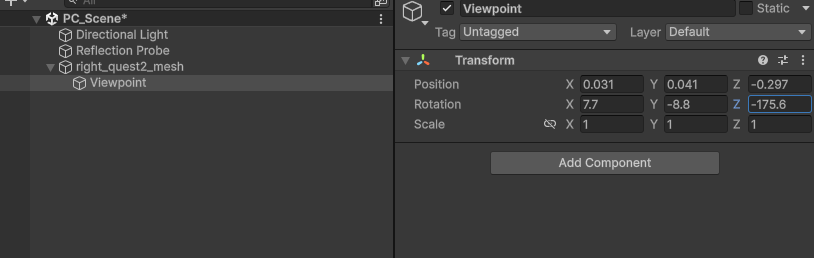
Set the Viewpoint Transform to these values (specific to the sample sequence):
| X | Y | Z | |
|---|---|---|---|
| Position | 0.031 | 0.041 | -0.297 |
| Rotation | 7.7 | -8.8 | -175.6 |
Tip
When tracking your own objects later, use Align With View (Ctrl+Shift+F) instead of entering values manually. The viewpoint doesn't need to be perfect — the tracker refines the pose during detection.
8. Add Outline Visualization (Optional)
Add a visual overlay to see the tracking in action:
- Select
right_quest2_mesh - Click Add Component and add TrackedBody Outline
- Toggle Show Internal Edges and Hide Source Mesh as desired
URP Only
If using URP, select your URP Renderer Asset and add:
- AR Background Renderer Feature (AR path only)
- Edge Outline Feature
If using the Built-in Render Pipeline, outlines work automatically — no extra setup needed.
9. Build & Run
Save the scene, then:
Mobile (AR)
- Open Build Profiles and add the current scene
- Select your target platform (Android or iOS) and your device
- Click Build and Run
- Allow camera access on the device when prompted
- Point the camera at the Quest 2 controller — the tracker will detect and lock on
Desktop (Webcam)
- Press Play in the Editor
- Point your webcam at the Quest 2 controller
- For best results, provide a camera calibration file — see Camera Calibration
- Save the scene
- Press Play in the Editor
- The sample sequence plays back and tracking starts automatically
What's Happening
- Detection — XRTracker renders the model from the viewpoint and searches for a match in the camera image
- Starting — Once detected, the tracker refines the pose over several frames to confirm a good lock
- Tracking — Continuous frame-by-frame pose optimization keeps the model aligned with the real object
The Tracking Quality indicator in the inspector shows how well the tracker is locked on (0.0 = lost, 1.0 = perfect).
Next Steps
- Tracking Overview — Understand the different tracking methods
- Model Preparation — Optimize your 3D models for better tracking
- Quality Metrics — Tune detection and tracking thresholds
- Camera Calibration — Calibrate your webcam for accurate tracking
- AR Foundation Guide — Set up mobile AR tracking on iOS/Android
- Edge Outline — Render outline-only visualization on tracked objects